
Get Sewing: How to Choose a Needle for Your Machine and Project
/At EverSewn, we recognize that accomplishing setting up your machine is more than half the battle, so we welcome you to our series “Get Sewing.” We’ll walk you through all the setup steps and will be here for reference until it all becomes old hat. So far, we’ve covered how to wind a bobbin and how to thread your sewing machine.
In this article, we’ll talk about choosing the right needle for your machine and project. We’ll discuss the parts of a sewing machine needle and why it’s important to choose the right one. As always, please also refer to the manual for your specific machine. Many of the concepts are the same for any sewing machine, but there may be some slight differences.

Demystifying Sewing Machine Needles
The tiny sewing machine needle that you’re holding in your hand (at least that’s how we’re picturing you right now…) has many parts all working together to give you the best stitch result.
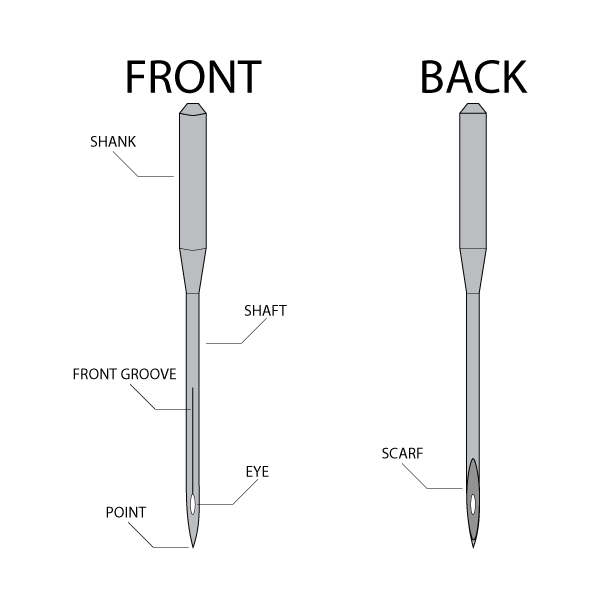
The front of your needle is rounded at the top, while the back is flat. This is to make sure your needle is seated correctly in your machine. The purpose each part serves is obvious in some cases and less obvious in others; regardless, let’s go over each part:
Shank - this is the part that is inserted into your machine.
Shaft - the thickness of this part determines needle size.
Front Groove - this is a long indention on the front of your needle that ensures a smooth stitch by guiding your thread into the eye.
Scarf (on the back) - this is an indentation at the back of your needle that helps your bobbin hook loop thread. A longer shaft prevents skipped stitches.
Eye - the part of your needle that thread passes through. Your needle type determines the size and shape of the eye.
Point - the part of your needle that passes through the fabric to pass thread to the bobbin hook and form your stitch. It is important not to use needles that have a bent or scratched point as this will affect the quality of your sewing (and directly impact your frustration level!).
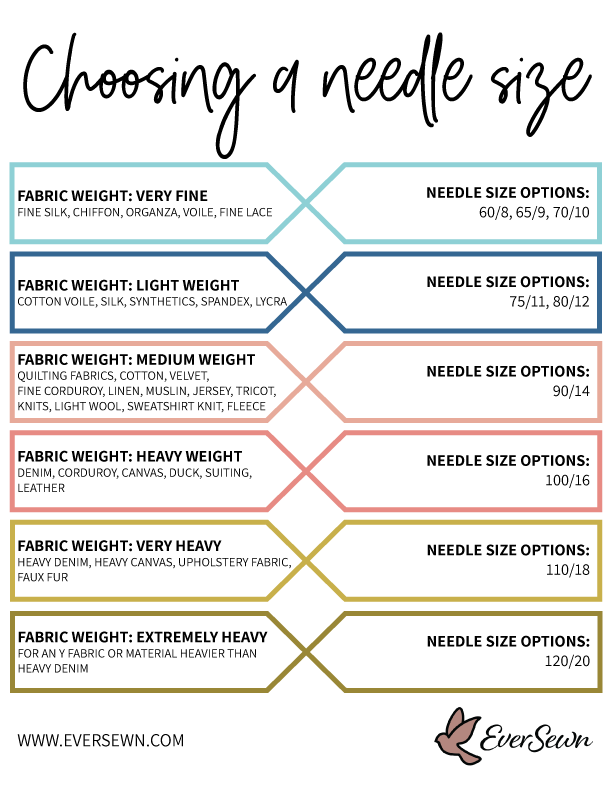
How to Choose Needle Size
Let’s discuss the confusing needle sizing numbers. Most needles note both the American and European sizes resulting in something that does not translate to an intuitive knowledge of what needle to use in what situation. American needle sizes range from 8 to 19, while European needle sizes range from 60 to 120.
The larger the numbers, the larger the needle. The thicker your fabric, the larger the needle you’ll need! We’ve created a handy dandy chart that you can click on and download to print and save in your craft space!
Needle Points Matter
After selecting the appropriate needle size, choose the type of needle point that matches your fabric type. Needle point type names correlate closely to fabric or project names, so this is much more intuitive than needle sizing! Let’s touch on eight common types:
Ballpoint - This is the type of needle you need when sewing on stretchy material, like knits. As you might guess, the tip of a ballpoint needle is rounded instead of sharp. These are larger needles, typically ranging from 9 to 16 on the American sizing scale.
Quilting Point - As you can probably guess from its name, you’ll reach for this type of needle when you’re sewing through several layers of fabric like you do when quilting. These needles have a tapered point and are typically in the smaller range of needle sizes.
Denim - These needles are strong and very sharp to sew through tough cloth like denim and canvas.
Leather - This needle tip is wedge-shaped to help it punch through heavy materials like leather and vinyl.
Embroidery - This needle tip has a very sharp point and the whole shape of the needle is slightly different to incorporate a larger eye and a shorter length. The larger eye allows for thicker embroidery thread and the shorter point to eye length allows for more space between the needle point and the material being embroidered as it moves through stitches.
Metallic - This needle is intended for use with metallic thread, just as its name implies. The elongated Teflon eye and the shape of the needle shaft help protect the delicate metallic thread through the sewing process. When using metallic thread always remember to use the thread net on the spool.
Topstitch - Topstitching is a technique used to create a design on only the topmost layer of fabric, often seen as the decorative stitching on jeans. This needle has an extra-large eye and deep groove so it can be used on heavier fabrics or with heavier thread.
Universal - These are your go-to needles. They can be used on a wide range of materials and with a wide range of threads. If your project or material doesn’t fall directly within one of the specialties listed above, a Universal needle is what you want to use!
The Eye Test
No, we’re not referring to the eye squint you perform when trying to thread your needle. We’re talking about making sure your needle and thread are a good match! Your thread should easily pass through the eye of your needle.
A good way to double-check that your needle and thread are going to work well together is to place the thread in the front groove of your needle. It should be a cozy, but comfortable fit. You know, like that favorite hoodie of yours.
The Finishing Stitch…Er, Thought
Another good source for more in-depth information on sewing machine needles are manufacturers like Schmetz. When you consider the fact that thread will go past the needle eye 80 times before it settles into its final resting spot, it’s easy to understand why the quality of needle plays such a big part in the success of your sewing project.
Sewing machine needles need to be changed regularly to give you the best results. Each needle should provide 8 - 12 hours of problem-free sewing. The needle may be one of the smallest parts of your sewing machine, but it is the part that literally brings your project together.