

Get Sewing: How to Thread a Sewing Machine
/At EverSewn, we recognize that accomplishing setting up your machine is more than half the battle, so we welcome you to our series “Get Sewing.” We’ll walk you through all the setup steps and will be here for reference until it all becomes old hat.
If you’re here from the “How to Wind a Bobbin” post - welcome and congrats on successfully winding your bobbin(s)! If winding a bobbin is still a mystery to you, use this step by step walkthrough to learn how to wind a bobbin.
In this article, we’ll walk you through threading your sewing machine. There are three major steps to threading your sewing machine and we’ll cover each step in detail! As always, please also refer to the manual for your specific machine. Many of the concepts are the same for any sewing machine, but there may be some slight differences.
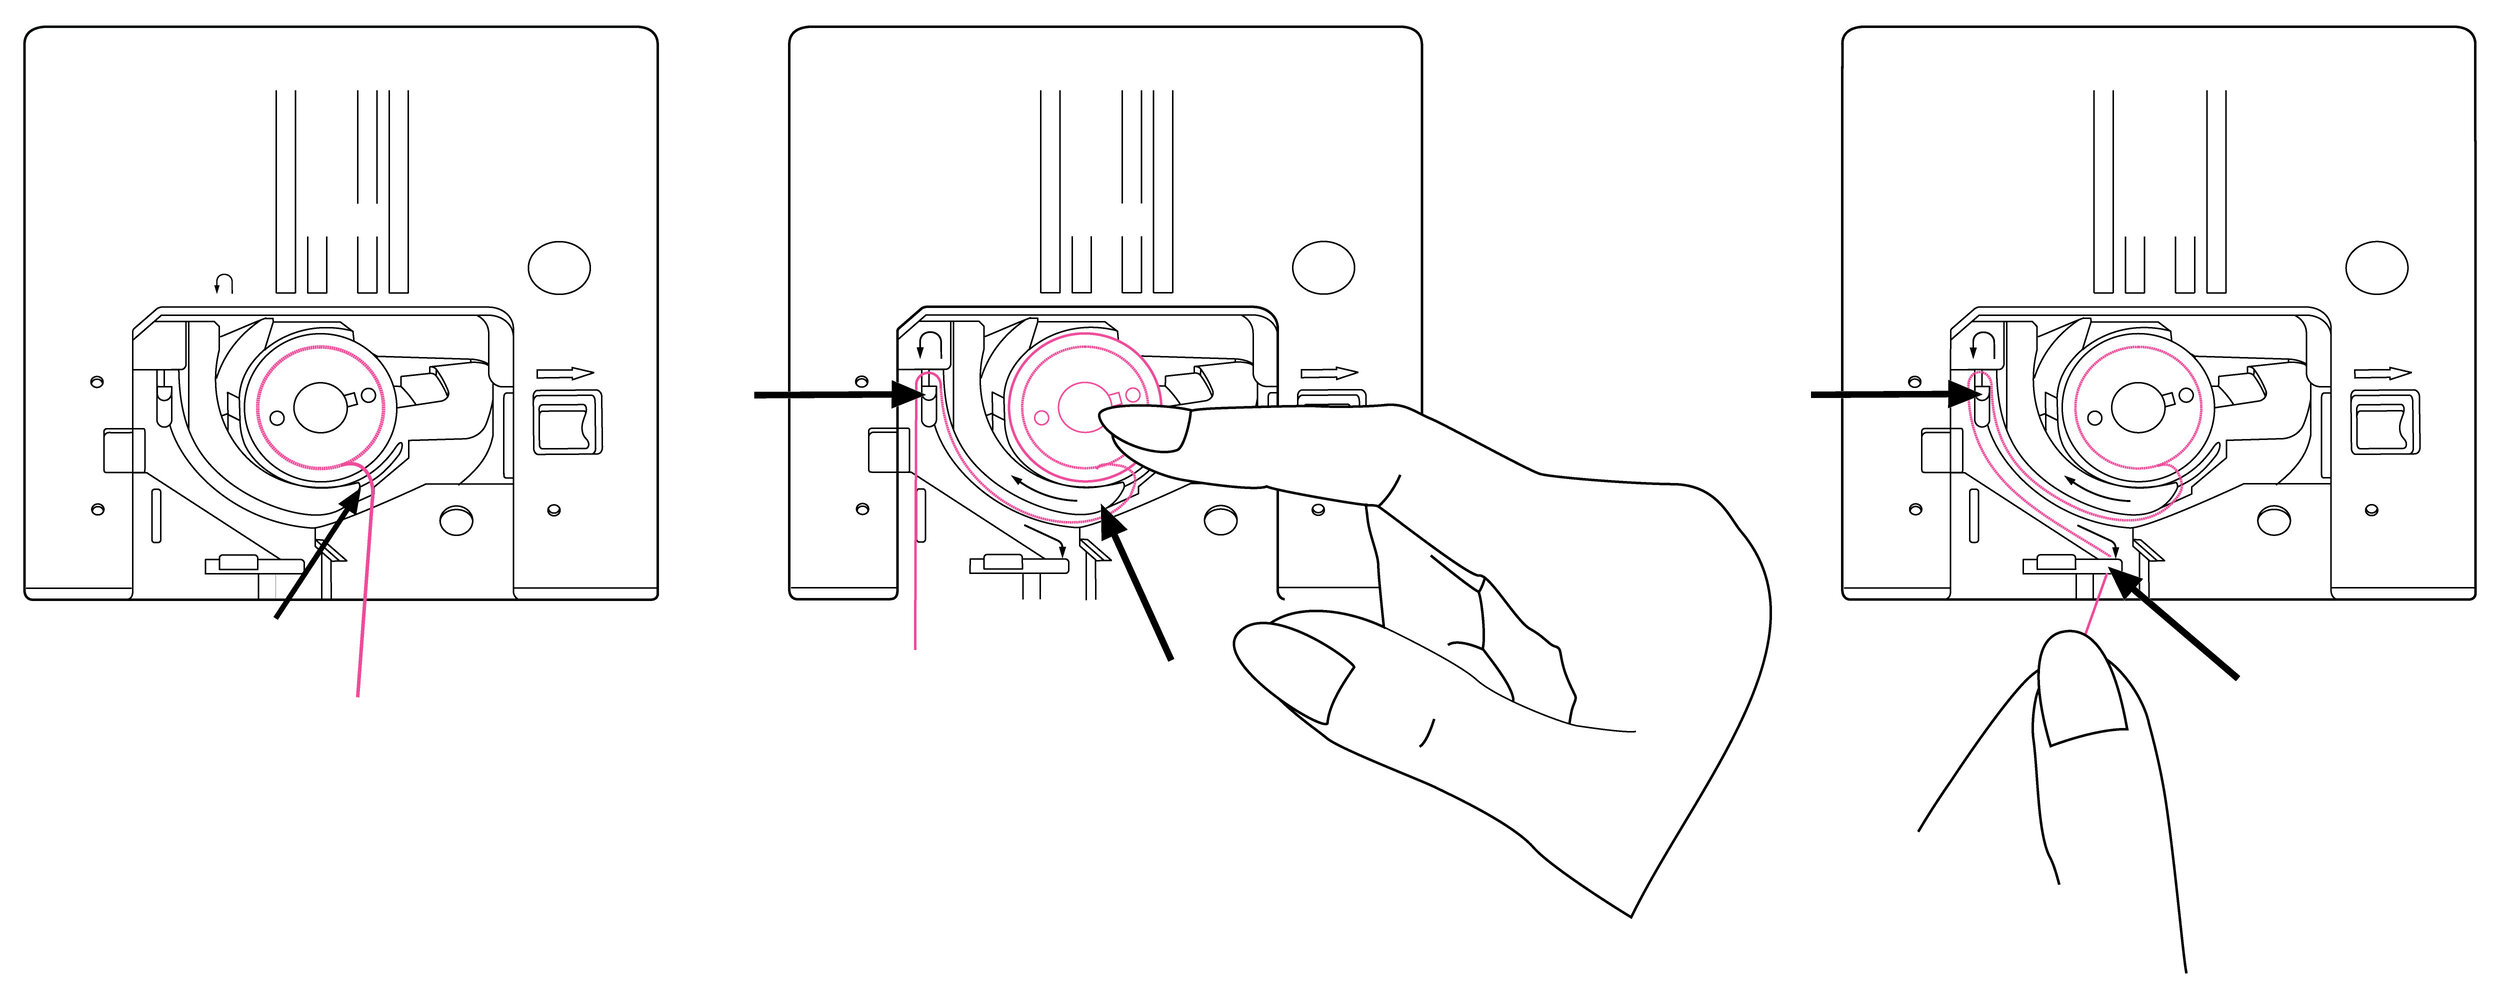
STEP 1: Inserting the Bobbin
First, please make sure your sewing machine is turned off before placing or removing the bobbin. When placing or removing your bobbin, the needle and presser foot must be in the topmost position to allow access to the bobbin space.
When inserting your wound bobbin, place it in the bobbin case with the thread running counter-clockwise. Pull the thread through the slit, as shown in the first illustration below. Hold your finger gently on the top of the bobbin and wind your thread through the thread guide as shown in the second illustration below.
Pull the thread through the thread guide and cut off the excess thread as shown in the third illustration below. Again, keep in mind that the exact layout may be different on your machine. The general steps should be the same, but please check your machine’s manual for information specific to your sewing machine’s layout.
STEP 2: Threading the Upper Thread
Okay, we’ve got the bobbin placed correctly. Now it’s time to thread your top spool. Keep in mind that your machine may have either an upright or vertical peg or an adaptor to place your spool of thread in either configuration.
This is a good time to talk about two different types of spools of thread - cross-wound and stacked. In short, if you have a spool of thread that is cross-wound (the thread forms a zig-zag or X pattern on the spool) it should be placed on your machine using the horizontal spool pin so that the thread comes off the top of the spool. If you have a spool of thread that is stacked (the thread runs smoothly in parallel to the spool) it should be placed on your machine using the vertical spool pin so that the thread comes off the spool at a right angle. Made to Sew does a great job explaining the differences in cross-wound vs stacked spools of thread in greater detail.
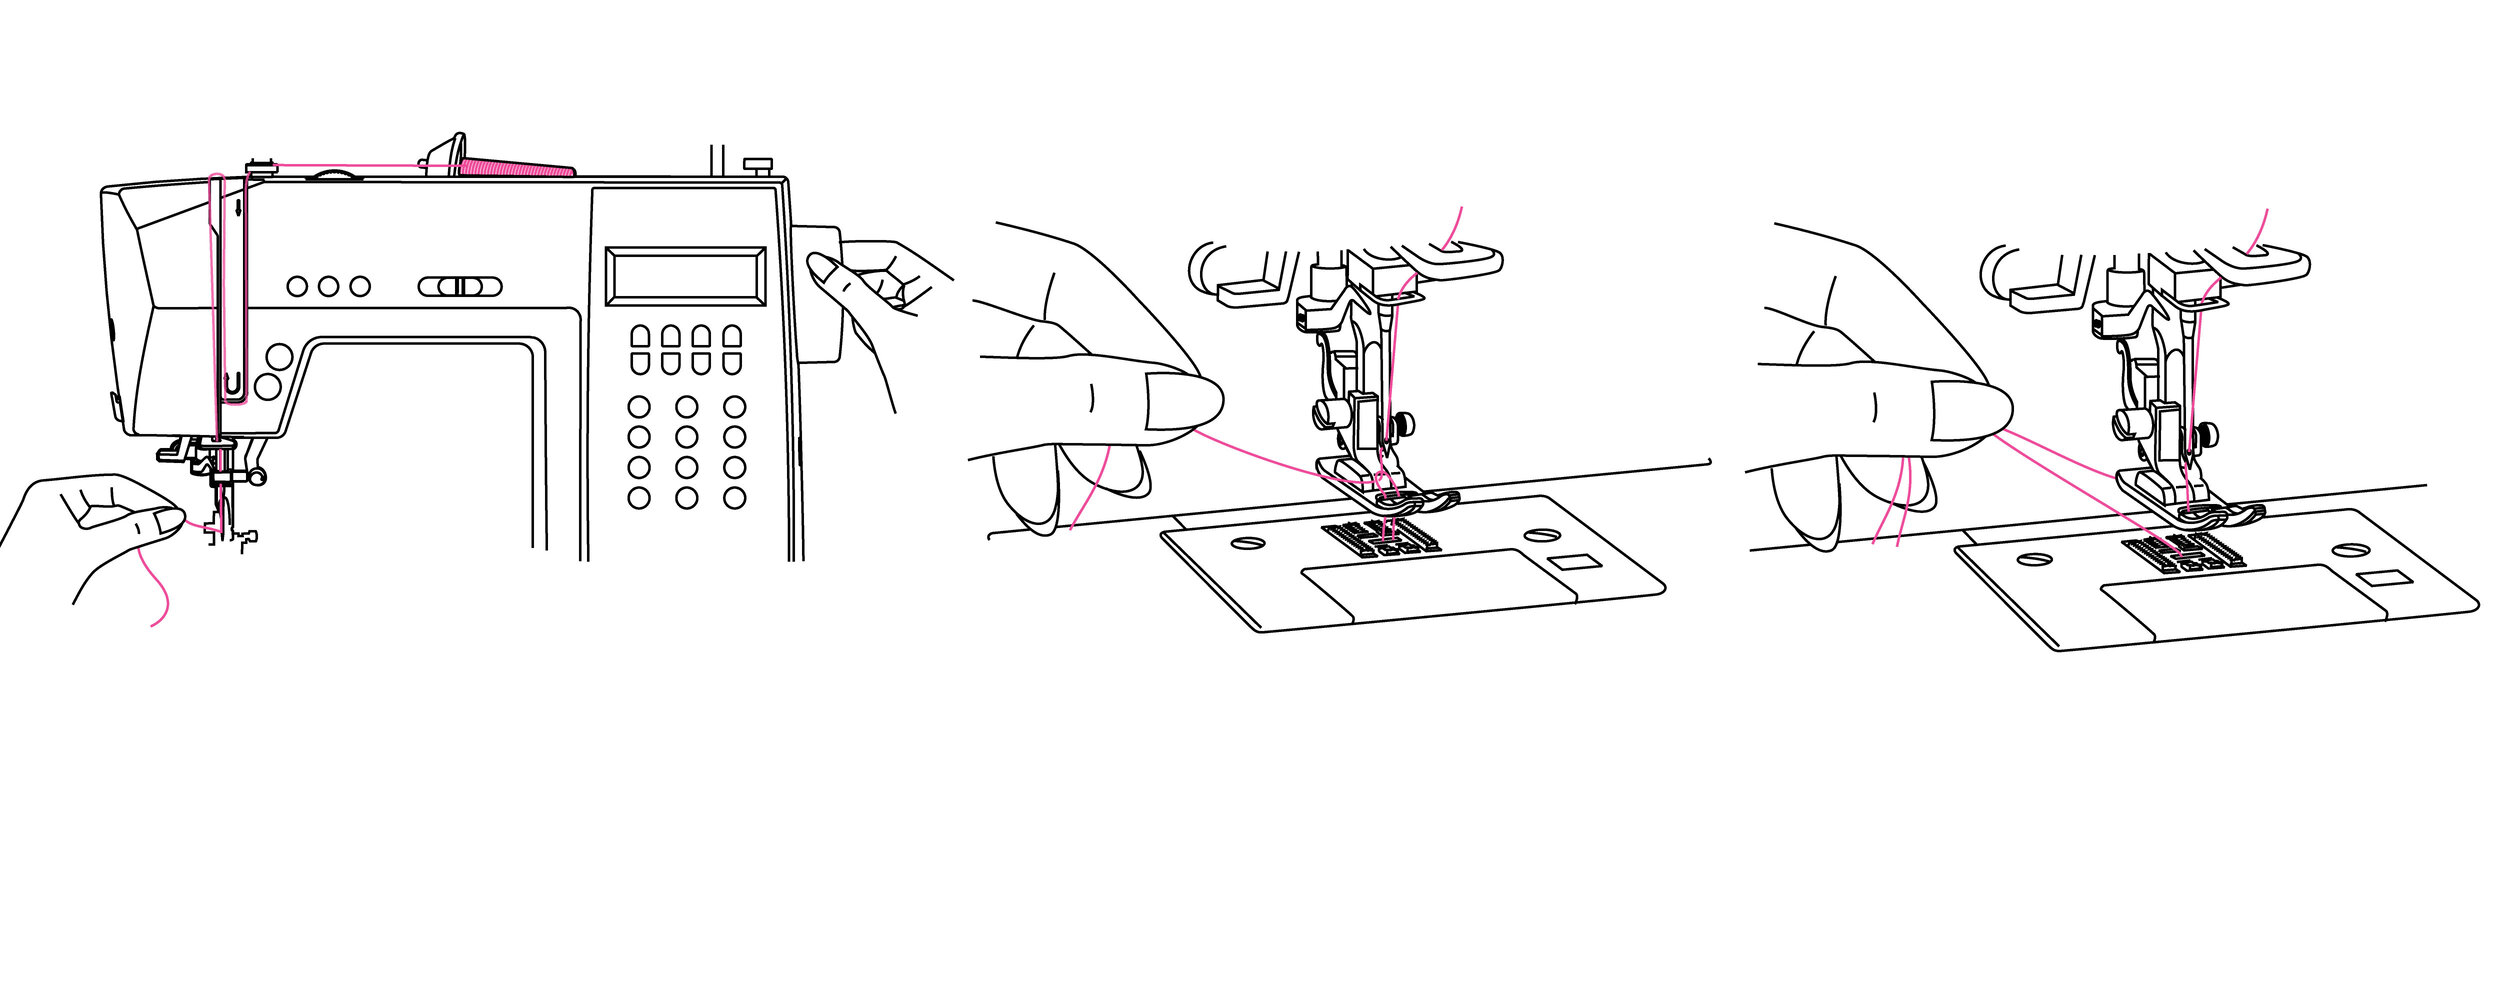
Do a quick double-check that your needle and presser foot are still in the topmost position. If they’re not, the thread will not engage with the tension disks and will cause headaches later on! Once you’ve placed your spool of thread, pull the thread through the thread guide on the top of your machine. Your machine may have a small thread guide at the midpoint between the spool and the larger thread guide all the way to the left. If it does, don’t skip snapping your thread into that guide!
Once you’ve accomplished that, bring the thread through the pre-tension spring as shown in the first illustration below. Pass your thread down through the tension disks then down and around the take-up spring as shown in the second illustration below. Follow the arrow with your thread back up and through the slotted eye of the take-up lever as shown in the third illustration below.

STEP 3: Thread the Needle
Please note that this step will differ dramatically if you have a machine with an automatic threading feature. Refer to your manual for details if this is the case. Pass your thread through the thread guide located above the needle as shown in the image below. Some machines have two thread guides above the needle. Make sure to grab them both if your machine has this configuration! Bring the thread through the eye of the needle from front to back.

STEP 4: Drawing Up the Lower Thread
To draw up the lower thread, first, hold the upper thread with your left hand and turn the handwheel toward you (counterclockwise) to lower and then raise the needle as shown in the first illustration below. Note, unless you’re purposefully attempting to remedy an issue, the handwheel should always be turned counterclockwise. Gently pull the upper thread to bring the bobbin thread up through the needle plate hole. The bobbin thread will come up in a loop as shown in the second illustration below. Pull both threads to the back under the presser foot as shown in the third illustration below.
STEP 5: Test Run!
Whew - we’re on the last step! Way to hang in there. You’re almost ready to sew! Before sewing, please check to be sure you’re using the correct needle, stitch plate, and presser foot for your project. Choosing the incorrect tools could cause damage at worse or make your project really frustrating at best! For more information on choosing the right equipment, check out our post on choosing the right needle for the job.
Once you’ve threaded your machine and put the right tools in place, we recommend sewing a sample to make sure all is well before starting on your project. Sew a small sample and inspect the top and bottom threads. The stitches should be smooth and even. If they are then you know your threading and tension is right and you can proceed with confidence!